
| Peter Upton's |
Subbuteo Tribute Website. |
|
Playing Instructions and Rules. |
|
Rugby Rules (OO Scale) 1969-82 . |
Rugby Rules: 1950s; 1960s-80s (this page). Cricket Rules: 1950s; 1960s-80s
Subbuteo Cricket - Page 1: Box Sets, Page 2: Accessories
Subbuteo Rugby - Page1: Box Sets, Page 2: Accessories, Page 3: Teams
Subbuteo Football boxed editions
This was the third Subbuteo game sold throughout the golden age of the 1970s, alongside football and cricket. It is also the problem game. The one that doesn't work. It is a joke in the collecting community that rugby sets are always found in great condition, because they only got played with the once.
Whilst the OO scale football and cricket sets are simply updated versions of Subbuteo's tried and tested earlier games, the OO rugby has little in common with the 1950s version. It arrived in the range at the end of the 1960s, much later than the football or cricket, and it is suggested that the invention of the "scrummer" played a big part in encouraging the production of this version. The game uses similar figures to the football game and the same flick-to-kick principle, which is the game's first problem. Obviously, the uneven bounce of a rugby ball makes kicking hazardous in the real game, and the same applies here. However, in Subbuteo rugby you also have to flick the ball to run with it. This can be extremely frustrating. It also brings other problems such as the player "carrying" the ball being much slower than any defender chasing him. This is clearly unrealistic.
So countless Subbuteo devotees have produced "house" rules to try and make the game more playable. I'll give a few ideas at the end of the rules proper. What you can do is hit the ball in different places to control it. In table soccer, you hit the ball in different spots to control the angle of movement. Here you need to consider the speed of the ball as well. Hit the ball in the middle of the long side, and it is likely to run away from you. Hit it on the points, and it doesn't move very far.
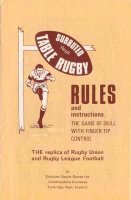
Whilst most Subbuteo rulebooks do go through different editions, the rugby leaflet goes through several distinct versions fairly quickly. It is almost as if the game was issued before the rules had been fully worked out. The original 1969 rule book has what is best described as a freeform rules section. It begins with a section on "how to score a try", which isn't exactly the first information you need. It goes on to sections titled "converting a try", "drop goal", "passing", "the scrummage", "tackling", "throw in", "making a mark", "offside", and "kicking into touch" in that order. This rule book received a 1970 update, which added three more sections - "Kick Off" (pretty essential you would have thought), "kicking" (just before drop goal), and "possession" (before passing). It also added a beginners note on getting the ball to stand up in the full-back kicker.

The 1971 rules were a big improvement, and formed the basis of the later rule books, with the rules finally numbered and in a logical order. In this book the original kicker with adjustable base was replaced by the kicking wedge. However, the book dropped a big clanger, as the "scoring a try" section was missed out completely! Sets with this book usually have a separate typed "scoring a try" sheet typed and photocopied onto yellow paper.
This means that these new rules were quickly replaced by a 1971-72 version, and this one also included the rules for the then new Display/Seven-a-side edition (which originally came on another separate sheet - see above). This book was further updated with a 1978 "Chiddingstone Causeway" edition, which showed the increased team range on the back. This final version is the one featured here. This book removed reference to the Display Edition in the seven-a-side rules, and features new pictures. The old illustrations had featured heavyweight players, whereas the new ones featured the proper rugby figures. Although by 1978 the rugby figures seem to be replaced by standard heavyweights anyway, so surely this exercise was a little futile. At least the new illustrations showed the correct distance on the line-out.
Rugby Rules.
INTRODUCTION
(At last) 'Rugger' enthusiasts can now experience the thrills and excitement enjoyed by Subbuteo Table Soccer fans the world over. Here (at long last) is a table-top Rugby game that incorporates every exciting feature of the real thing-either Rugby Union or Rugby League, and including the now popular 'Seven-a-Side'. Tries, conversions, scrummages, drop-kicks - they are all yours to play with Subbuteo Table Rugby. What is more, the game is based on the famous Subbuteo 'finger-tip' control principle familiar to all Subbuteo enthusiasts, which makes it a real game of skill based on live 'Rugger' tactics.
After months of research we completely re-designed Subbuteo Rugby and our Development Department produced what we believe to be the only real table-top 'rugger' game in existence. It is designed for fans of both codes - Union or League - and these comprehensive rules cover all the essentials of both. Enthusiasts will not require any direction from us as to how to make the minor adjustments involved, such as playing with either thirteen or fifteen figures, in order to enjoy the game they prefer.
Obviously, there are limits to what one can achieve in miniature on a table-top but we believe we have given you an action-packed replica of the great international game that will provide endless and fascinating pleasure for young and old. As with Subbuteo Table Soccer, it is necessary to master the 'finger-tip' control principle in order to acquire skill and get full enjoyment from the game. Therefore study the instructions carefully, practise regularly, then you will be able to teach all your friends how to play Subbuteo Table Top Rugby Union, Rugby League or Seven-a-Side.
The introduction is little changed through all the editions of the rule book. The 1969 and 1970 rules stress that the game is "new", and 1971 adds in the seven-a-side references.
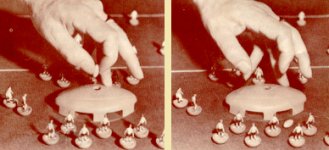
THE SECRET OF SUCCESS-FINGER TIP CONTROL
Skill and fun go together and depend entirely on YOUR mastery of the exclusive
Subbuteo 'finger-tip' method of propulsion of the Rugby figures. Study and
practice the basic method as shown in Photos 'A' and 'B'. The figure is
controlled and directed by a movement of the finger that puts the figure in
contact with the ball and also to run the figures into tactical positions and
moves.
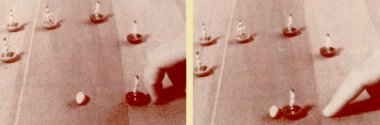
Subbuteo Table Rugby is based on the unique design of the plastic bases carrying the figures. This principle enables the skilful player with practised touch to propel the figures in such a manner that they can 'weave' and 'swerve' and carry the ball along at their feet. When you have mastered the principle and are able to propel the ball in any direction by a movement of the finger, then practise 'spinning' the figures and 'weaving'. This cannot be learned in a few minutes, but patient practice will reward your efforts.
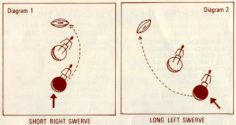
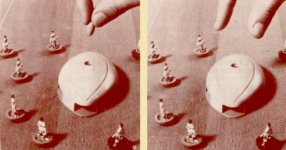
HOW TO "SPIN" THE FIGURE
The base of the figure should be propelled lightly with the hand held upright or
on its side, according to position. To spin to the left you 'propel' the RIGHT
side of the base. To spin to the right you 'propel' the LEFT side of the base.
The Diagrams 1 and 2 show methods of application. The Black figure is yours. The
White figure is your opponent. The dotted line shows your line of approach to
the ball by the 'spin' method.
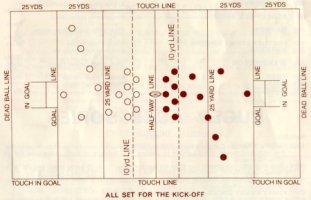
SETTING OUT THE GAME
The Subbuteo Table Rugby green baize marked-out Playing Pitch is a scale
replica of the official Rugby pitch, specially woven to give the ideal playing
surface. The game should be played on a table larger than the overall size of
the cloth so that there is reasonable free space outside the playing lines. Best
results will be obtained if the cloth is laid smoothly on top of a heavy table
cloth or blanket to prevent slipping and wrinkling. The goals should be firmly
inserted into the green goal bases and set up with the extended support flanges
pointing backwards, off the pitch away from the 'in goal line. The teams should
be set up in the conventional 15 (R.Union) or 13 (R.League) formation. The
Live-Action Fullbacks should be placed between and just behind the goalposts.
And you are ready to play. Scoring is as with live Rugby. (In the game, the
different rugby league scoring system only arrived in the 1971 rule book. Please note that
rugby scoring in both codes has changed since the 1970s)
| RUGBY UNION - | RUGBY LEAGUE - |
|
|
POSITION OF THE GOALS
In order that the goal bases do not interfere with current play (scoring of
tries, etc.) it is suggested that the goals be placed on the dead ball line,
until they are required for conversion and penalty kicks. Then the goals should
be temporarily brought forward to the normal Rugby position on the goal line.
SUBBUTEO TABLE RUGBY RULES
In conjunction with the Rules of Rugby (either code)
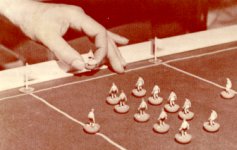
The original 1969 scrummage rules were a little different. "The players form up broadly as depicted (see illustration below) depending on Code being played, with the scrummer in position. The player awarded the scrum drops the ball into the scrummer from a height of no less than 1.5 inches. No more than three figures may be in the front line of the scrum. To be successful the ball must touch at least one figure of either side, and travel behind the first row of the scrum before play is continued. Failure to realise these conditions results after two attempts in the other side putting the ball in". This sounds more like a real-life scrum, but is probably much harder to achieve in practise.
 |
 |
| The heavyweight illustration. | The later illustration. |
(Rugby League)
 |
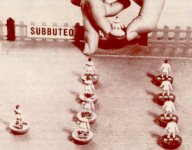 |
| The 1971-72 illustration. | The 1978 illustration. |
SEVEN-A-SIDE RULES - The game is played in accordance with the official Rugby Laws as adapted for and covered by Subbuteo Table Rugby Rules.
The normal duration of Seven-a-Side Rugby is seven minutes each way, with a one minute half-time break. The playing formation is normally three forwards, one half-back, two three-quarters, and one full-back. The diagrams in the standard rules should be modified accordingly.
The playing pitch can be improvised with a thick smooth cloth or blanket spread over a table, on which the Rugby playing area can be chalked. The ideal playing surface is, of course, the special green baize marked out and printed, pitch supplied by Subbuteo Sports Games Ltd - under Reference RM.
These seven-a-side rules are not exactly thorough are they?
"House Rules".
Subbuteo games in general have a history of rule changes and amendments (just ask any of the various table soccer associations). But rugby is the only one that really struggles to produce a playable simulation within the official rules. So the point of this section is to throw around a few ideas to try with that mint set sitting in the loft!
What rugby does do better than football or cricket is allow tactical solo play (football has the problem of goalkeeping, whilst cricket is seriously tricky to play solo). So here are a few ideas that I've tried on my own in a slow thoughtful game. I'm not guaranteeing that they are brilliant, and feel free to e-mail alternatives to me. If you are lucky enough to have friends who don't think your Subbuteo obsession is nuts, then please feel free to send in rules for faster two player action..
Problem No.1. A player makes a clever dash up the field, but is finally blocked. He needs to pass, but all his team mates are standing unmoving way back down the field.
Solution ideas. Attacking Support Flicks.
Problem No.2. Defending players can run faster than the attacker, because he has to flick the ball. A forward bursting through the line in real rugby can score a breakaway try. In Subbuteo he vainly struggles to control the ball while a defending player can flick all the way across or down the pitch to make the tackle.
Solution ideas.
Problem No 3. Offside. Again, our clever attacker bursts through the opposing line. He gets tackled, but the defender has nobody to pass to because everybody is offside. A few possession changes later, and the players are all nicely mixed up.
Rule Clarification. Possession. It isn't completely clear when the "two inch" rule applies. You need to touch the ball and land within two inches to gain possession, but once you have possession I assume you no longer need to keep within this distance (otherwise you'd never get anywhere). The "two inch" rule applies again when you are trying to score a try, and it is recommended that it also applies before you declare a pass. Otherwise you can flick the ball wildly downfield, and then declare a pass, which means you can pick up the player and place him near the ball.
Problem No 4. Knock-on or kicking to gain ground. If a player is flicked at the ball, hits it forward and doesn't finish within two inches it is a knock on. However, you are allowed to do this under the "kicking to gain ground" rule. If you accept that the two inch rule doesn't apply when you are running with the ball, then how does this differ to kicking ahead anyhow?
Problem No 5. Conversions and penalties are a doddle. I can score every time.
Problem No 6. Scrums are fifty-fifty.
Problem No 7. There are way too many players clogging up the field.
Problem No 8. I want rucks, I want mauls....
Notes on playing Rugby League.
I enjoyed watching this on the TV with my Uncle Fred (sadly no longer with us). The modern game is built around the six tackle rule, and these tackles are used to gain ground.
Notes on the alternate "running without the ball" game.
This may work better with two players. When the player has flicked at the
ball, and remained within two inches of it, he has caught the ball and is ready
to run. At this point, the ball is removed from the pitch, and the appropriate
player is marked to show that he is carrying the ball. A possible alternative to
marking is to swap the player with a special ball carrier, say a player in the
same kit but on a different colour base.
Here's where the problems start. The wonderful curling ability of Subbuteo
figures means that the runner usually has two or three openings in the defence
through which the try line can be reached. It is all too easy to reach this in
one flick. So he needs to be slowed down. Here are some options....
Tackling - With no ball in play, the tackles are going to have to hit the ball carrier. Simple blocking isn't enough to stop a runner. When the runner is not in motion, it is very simple to hit him, as the players are normally very close together. So if moves are consecutive, the runner would get tackled at the end of each run. At that point I'd suggest that the runner has to pass, and the ball is put back into play next to the figure. This is a point where two attacking and two defending flicks might work tactically. So the pass is made, and the recipient needs to be flicked onto the ball and land within two inches to catch the pass. At this point, the defence could get another defensive flick to cover the catch, but certainly the recipient has to be allowed a run before a tackle is permitted. Otherwise the attacker ends up going backwards under constant tackles.
Then we get to tacking "in motion", which is how the 1950s game worked. The defender needs to flick a player to hit the attacker whilst he is actually running. The attacker can't be traveling too fast, because of the need to stop in the next zone. This might be the only way in which this version works, but is it really recommended with fragile playing pieces?
Problem No 9. I suddenly feel the need to put this rubbish game back in the loft, and play Subbuteo football....
Rugby Rules: 1950s; 1960s-80s (this page). Cricket Rules: 1950s; 1960s-80s
Subbuteo Cricket - Page 1: Box Sets, Page 2: Accessories
Subbuteo Rugby - Page1: Box Sets, Page 2: Accessories, Page 3: Teams
Subbuteo Football boxed editions
[ Main Page | Previous Page ]